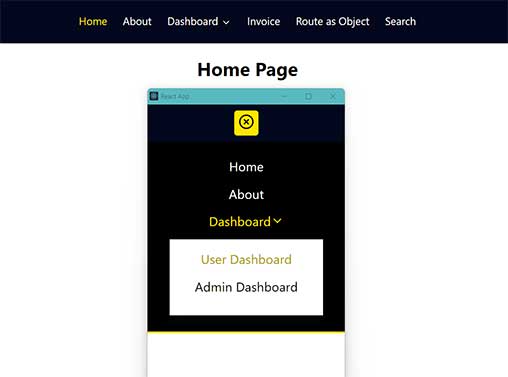
Creating a responsive navbar using ReactJS involves breaking down the task into smaller steps. Below is a step-by-step guide to help you create a basic responsive navbar using React:
Set Up React App:
If you haven't already, create a new React app using Create React App or your preferred method.
npx create-react-app react-router-v6
    cd react-router-v6
    npm install react-router-dom@6
    npm start
Run the following commands:
A browser window will open http://localhost:3000/
Next, Project structure your folder as follows.
src
    ├── components
    |   ├── Nav.css
    |   ├── Nav.js
    ├── page
    |   ├── About.js
    |   ├── AdminDashboard.js
    |   ├── Home.js
    |   ├── Invoice.js
    |   ├── OrderDetails.js
    |   ├── Orders.js
    |   ├── RouteAsObj.js
    |   ├── Search.js
    |   ├── Style.css
    |   ├── UserDashboard.js
    |   ├── UserEditProfile.js
    |   └── UserProfile.js
    ├── App.css
    ├── App.js
    ├── index.css
    └── index.js
1. Index File (index.js):
index.js import React from 'react';
    import ReactDOM from 'react-dom';
    import { BrowserRouter } from "react-router-dom";
    import './index.css';
    import App from './App';
    ReactDOM.render(
     <browserrouter> <app> </app></browserrouter>,
      document.getElementById("root")
    );
This file initializes the React application, wraps it with BrowserRouter to enable routing, and renders the App component at the root element.
2. App Component (App.js):
 App.js import { Route, Routes } from "react-router-dom";
import "./App.css";
import Nav from "./components/Nav";
import Home from "./page/Home";
import About from "./page/About";
import Invoice from "./page/Invoice";
import RouteAsObj from "./page/RouteAsObj";
import Search from "./page/Search";
import UserDashboard from "./page/UserDashboard";
import UserProfile from "./page/UserProfile";
import UserEditProfile from "./page/UserEditProfile";
import AdminDashboard from "./page/AdminDashboard";

function App() {
  return (
    <div className='app'>
      <Nav />
      <Routes>
        <Route path="/" element={<Home />} />
        <Route path="/about" element={<About />} />

        {/* Approach #1 */}
        <Route path="/user">
           <Route index element={<UserDashboard />} />
           <Route path="profile" element={<UserProfile />} />
           <Route path=":editId" element={<UserEditProfile />} />
           <Route path="admin" element={<AdminDashboard />} />
        </Route>

        {/* Approach #2 */}
        <Route path="invoice/*" element={<Invoice  />} />
        <Route path="object_route/*" element={<RouteAsObj  />} />

        <Route path="search" element={<Search  />} />
        <Route path="*" element={<NotFound />} />
      </Routes>
    </div>
  );
}

export const NotFound = () => {
  return <div><h1> 404 page not found </h1> </div>
}

export default App;
This component serves as the main structure of the application, defining routes using the react-router-dom library. It includes navigation, home, about, user, invoice, object_route, search, and a not-found page.
3. Navigation Component (components/Nav.js):
 components/Nav.js import { NavLink, Outlet } from "react-router-dom";
import React,{useState} from 'react';
import {FiAlignRight,FiXCircle,FiChevronDown } from "react-icons/fi";
import "./Nav.css";

const Nav = () => {
	const [isMenu, setisMenu] = useState(false);
  const [isResponsiveclose, setResponsiveclose] = useState(false);
  const toggleClass = () => {
    setisMenu(isMenu === false ? true : false);
    setResponsiveclose(isResponsiveclose === false ? true : false);
  };
  let boxClass = ["nav__container"];
  if(isMenu) {
    boxClass.push('responsive__nav__show');
  }else{
    boxClass.push('');
  }
  const [isMenuSubMenu, setMenuSubMenu] = useState(false);
  const toggleSubmenu = () => {
    setMenuSubMenu(isMenuSubMenu === false ? true : false);
  };
  let boxClassSubMenu = ["sub__menus"];
  if(isMenuSubMenu) {
    boxClassSubMenu.push('sub__menus__Active');
  }else {
    boxClassSubMenu.push('');
  }
  return (
  <div className='nav'>
	  {isResponsiveclose === true ? <>
      <span className="menubar__button" style={{ display: 'none' }} onClick={toggleClass} > <FiXCircle />   </span>
    </> : <>
      <span className="menubar__button" style={{ display: 'none' }} onClick={toggleClass} > <FiAlignRight />   </span>
    </>}
    <ul className={boxClass.join(' ')} >
      {/* Approach #1 --- Active  */}
      <li><NavLink onClick={toggleClass} className={({ isActive }) => isActive ? "active" : ""} to="/">Home</NavLink></li>

      {/* Approach #2 --- Active  */}
      <li>
        <NavLink onClick={toggleClass} style={({ isActive }) => {
          return {
            color: isActive ? "#ffe500" : ""
          };
        }} to="/about">About</NavLink>
      </li>
      <li onClick={toggleSubmenu} className="sub__menus__arrows"><NavLink className={({ isActive }) => isActive ? "active" : ""} to="/user">Dashboard <FiChevronDown /> </NavLink>
        <ul className={boxClassSubMenu.join(' ')} >
          <li><NavLink onClick={toggleClass} className={({ isActive }) => isActive ? "active" : ""} to="/user">User Dashboard</NavLink></li>
          <li><NavLink onClick={toggleClass} className={({ isActive }) => isActive ? "active" : ""} to="/user/admin">Admin Dashboard</NavLink></li>
        </ul>
      </li>
      <li><NavLink onClick={toggleClass} className={({ isActive }) => isActive ? "active" : ""} to="/invoice">Invoice</NavLink></li>
      <li><NavLink onClick={toggleClass} className={({ isActive }) => isActive ? "active" : ""} to="/object_route"> Route as Object </NavLink></li>
      <li><NavLink onClick={toggleClass} className={({ isActive }) => isActive ? "active" : ""} to="/search"> Search </NavLink></li>
      <Outlet />
    </ul>
  </div>
  );
};

export default Nav;
 page/Invoice.js import React from "react"
import {NavLink, Routes, Route, Outlet } from "react-router-dom"
import Orders from "./Orders";
import OrderDetails from "./OrderDetails";
import "./Style.css";

const Invoice = () => {
  return (
    <div className='admin__dashboard'>
      <h1> Invoice </h1>
      <ul>
        <li> <NavLink className={({ isActive }) => isActive ? "active" : ""} to="profile">Profile</NavLink> </li>
        <li> <NavLink className={({ isActive }) => isActive ? "active" : ""} to="orders">Orders</NavLink> </li>
        <li> <NavLink className={({ isActive }) => isActive ? "active" : ""} to="review">Review</NavLink> </li>
      </ul>
      <div className="dashboard">
        <Routes>
          <Route path="profile" element={<Profile />}></Route>
          <Route path="orders" element={<Orders />}></Route>
          <Route path="review" element={<Review />}></Route>
          <Route path="order_details/:orderId" element={<OrderDetails />} />
        </Routes>
      </div>
      <Outlet />
    </div>
    )
}
  export const Profile = () => {
    return <h2>Profile</h2>
  }
  export const Review = () => {
    return <h2>Review</h2>
  }

export default Invoice
 page/RouteAsObj.js import React from "react"
import { useRoutes, Outlet } from "react-router"
import { Link } from "react-router-dom"

const RouteAsObj = () => {
  let element = useRoutes([
    { path: "/", element: <Route1 /> },
    { path: "route2", element: <Route2 /> },
    { path: "route3",element: <Route3 />,
      // children can be used to configure nested routes
      children: [
        { path: "child1", element: <Child1 /> },
        { path: "child2", element: <Child2 /> },
      ],
    },
    { path: "*", element: <NotFound /> },
  ])

  return (
    <div className='admin__dashboard'>
      <ul>
        <li> <Link to="">Route1</Link> </li>
        <li> <Link to="route2">Route2</Link> </li>
        <li> <Link to="route3">Route3</Link></li>
      </ul>
      {element}
    </div>
  )
}

const Route1 = () => <h1>Route1</h1>
const Route2 = () => <h1>Route2</h1>
const Route3 = () => {
  return (
    <div>
      <h1>Route3</h1>
      <ul>
        <li> <Link to="child1">Child1</Link> </li>
        <li> <Link to="child2">Child2</Link> </li>
      </ul>
      <Outlet />
    </div>
  )
}
const Child1 = () => <h2>Child1</h2>
const Child2 = () => <h2>Child2</h2>
const NotFound = () => <h1>NotFound</h1>

export default RouteAsObj
  page/Search.js
import React, { useRef } from "react"
import { useLocation, useNavigate } from "react-router-dom"
function useQuery() {
  // Use the URLSearchParams API to extract the query parameters
  // useLocation().search will have the query parameters eg: ?term=bar&a=b
  return new URLSearchParams(useLocation().search)
}
const Search = () => {
  const query = useQuery()
  const term = query.get("term")
  const inputRef = useRef(null)
  const navigate = useNavigate()
  const formSubmitHandler = e => {
    //prevent the default form submission
    e.preventDefault()
    //extract search term using refs.
    const searchValue = inputRef.current.value
    navigate(`?term=${searchValue}`)
  }
  return (
    <div>
      <h1> Search </h1>
      <form action="" onSubmit={formSubmitHandler}>
        <input type="text" name="term" ref={inputRef} />
        <input type="submit" value="Search" />
        {/* Display the search term if it is present */}
        {term && <h2>Results for '{term}'</h2>}
      </form>
    </div>
  )
}

export default Search
 page/UserDashboard.js import React from 'react'
import { Link } from "react-router-dom";
import "./Style.css";

const UserDashboard = () => {
    let ids=1007;
    return (
        <div className='user__dashboard'>
            <h1> User Dashboard </h1>
            <Link to="profile" className='btn'> User Profile </Link>
            <Link to={`/user/${ids}`} className='btn'> Edit Profile</Link>
        </div>
    )
}

export default UserDashboard
  page/UserProfile.js  import React from 'react'
import { useNavigate } from "react-router-dom";

const UserProfile = () => {
    const navigate = useNavigate();
    return (
        <div>
            <h1> User Profile</h1>
            <button onClick={() => navigate(-1)}>Go back</button>
        </div>
    )
}

export default UserProfile
  page/UserEditProfile.js  import React from 'react'
import { useNavigate, useParams } from "react-router-dom";
import "./Style.css";

const UserEditProfile = () => {
  let params = useParams();
  let navigate = useNavigate();

  const handleClick =()=> {
     navigate('/user/profile');
  };

  return (
    <div>
      <h1> Edit Profile </h1>
      <p> <b> Profile Id </b> : {params.editId} </p>
      <button onClick={handleClick} className='btn__button'> useNavigate Instead of useHistory </button>
    </div>
  )
}

export default UserEditProfile


